
2010 URJ200 3UR-FE 5.7L V-8 gasoline engine
I did an oil/filter change on the LC200 today, at 1175 miles, and thought I'd share the experience. It was more complicated compared to all my previous vehicles due to having to remove a skid plate and deal with the cartridge type of filter. But, it wasn't that bad at all and after the first time, every future oil/filter changes will become much easier. Although the crew at my dealer (Tustin Toyota, CA) is completely trustworthy (from past experiences with my FJ Cruiser), I've always done oil/filter changes myself because I kind of enjoy getting a little dirty. Hahaha!
Tools:
- Flat head screw driver
- 10mm socket
- 12mm socket
- 14mm socket
- 15/16" socket
- 1/2" drive ratchet + extension
- 1/2" drive torque wrench

- Oil filter socket wrench (64mm, 14 flats). I bought it at the dealer. It fit and performed perfectly.

- Oil filter: the box contained the filter, a large and a small rubber O-rings, and a plastic drain tube.

- Waste-oil receptacle that can hold 8 or more quarts.
- Gloves and eye-protection
1. DRAINING THE MOTOR OIL:
- First, look at the front passenger's side lower control arm (A-arm). The legs of the A-arm (yellow lines in pic below) will lead you to the motor oil pan and drain bolt (green circle). To access the drain bolt, you'd only need to remove the small cover by unscrewing two 12mm bolts (red arrows). This was my first time under the LC so you will see in other pics that I had removed the large skid plate as well, to check out everything else.

- The pic below shows the small cover removed (The Fumoto valve will be discussed later).

- Use the 14mm socket to loosen the oil drain bolt and then unscrew by hand (be cautious if oil is hot). Try not to lose grip of the slippery oil-covered drain bolt or it could disappear to the bottom of your waste-oil receptacle! Oil will shoot out toward the passenger's side tire, so position your waste-oil receptacle accordingly. After the oil has drained, replace the drain bolt. Be sure to have a washer of good condition on the bolt. Sometimes, the washer gets stuck to the pan (as in pic below) so check there if you don't see your used washer on the bolt. Be careful not to cross thread.

- I replaced the oil drain bolt with this Fumoto valve to facilitate future oil draining. It looks like the O.E. skid plate would be able to protect the valve well enough. Furthermore, it's not so easy to slide the lever open -- you need to pull/click it up first and then slide it open. This LC is my DD, but if I was to take it off-roading, I would want to install aftermarket skid plates that offer the valve more protection. I've been using the Fumoto valve on my FJ Cruiser off-roading for the past three years and there's been no problem, granted, it sits well above an aftermarket skid plate.


2. CHANGING THE MOTOR OIL FILTER:
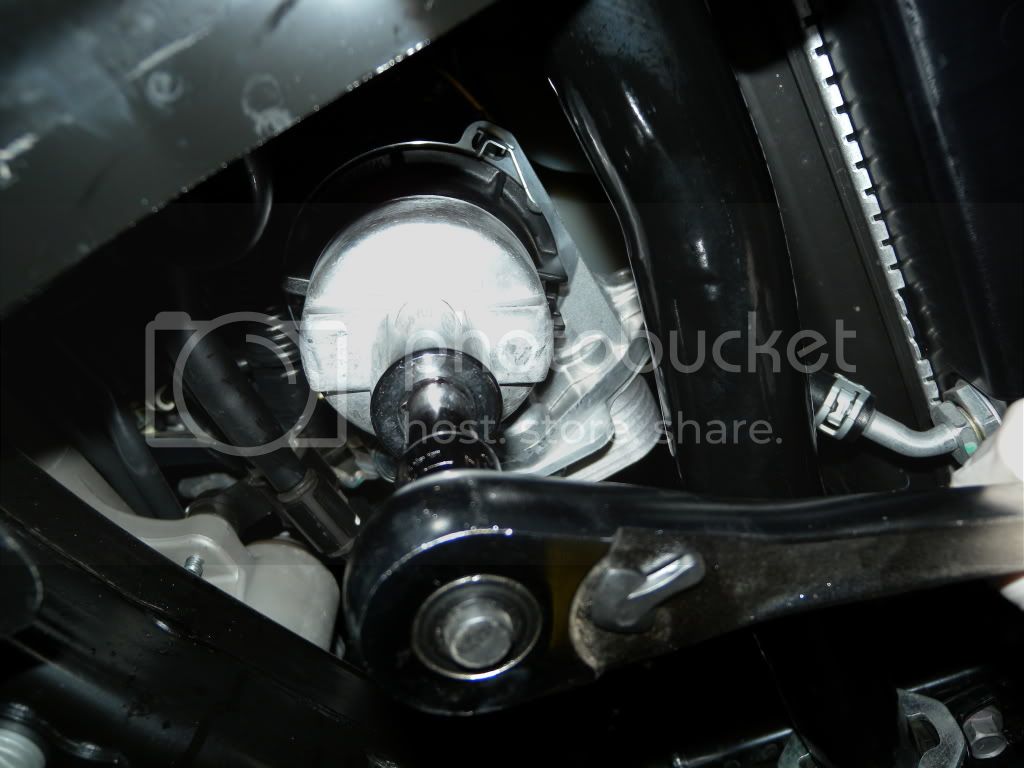
- Looking underneath, you will see two front skid plates side-by-side. To access the oil filter assembly, you'd need to remove the driver's side front skid plate by undoing five 12mm bolts & three 10mm bolts. You will find the oil filter assembly rearward of the sway bar.

- Now, position the waste-oil receptacle underneath the oil filter housing. Use the 1/2" drive ratchet with extension to remove the oil filter bolt. A little bit of oil will drip out.

- A small rubber O-ring may or may not have come off along with the bolt. If it did not come off, leave it there on the housing.

- If the O-ring came off, place it on the plastic drain tube that came with the new oil filter. This tube is used to drain oil from the filter housing.

- Insert, forcefully and quickly, the plastic drain tube up into the housing, and retract your fingers quickly because oil will pour out right away (be cautious of hot oil).


- When the oil stops, remove the plastic drain tube by pulling it sideway and down.
- Use the oil filter socket wrench (64mm, 14 flats) and the 15/16" ratchet with extension to remove the oil filter housing.

- Pour out the rest of the oil from the housing.

- Pull out the used filter.

- Remove the used large O-ring. Be careful to avoid damaging the groove on the housing.

- Wipe clean the housing assembly. Prepare the new large O-ring by smearing it with a little bit of clean motor oil. Put it on the housing, making sure it seats correctly in the groove. Insert a new filter and reinstall the housing. Torque to spec. (18 ft. lbf.).
- Smear motor oil onto the new small O-ring and put it into the groove at the bottom of the housing. Reinstall the filter housing bolt.
- I used a funnel to keep things clean.

- According to 2010 LC Owner's Manual, the oil capacity, with the filter changed, are: 7.4 quarts for vehicles with blue-markered dipstick handle, and 7.9 quarts for vehicles with green-markered dipstick handle.
- Replace the motor oil filler cap.
- I refilled with 8 quarts. After having run the engine for a few minutes, the oil level was just under 1/2 between the low and full marks on the dipstick. But, after having driven for 30 minutes and cooled down for 2 hours, the level was up at 9/10. So I drained a little out. Next time, I'll definitely put in less than 8 qts.
6. Of course, dispose the waste oil appropriately. I brought it to a local automotive parts store.
Disclaimer: This thread is merely me sharing my experience and is not meant to be a complete instruction. I'm not responsible for any damages resulting from your work. If you are not able, please have a qualified mechanic perform the work.
Last edited:
")


